just back from a week's vacation, despite disconnecting the 12v battery, and despite charging it up a few hours right before leaving, it was down to 5v when I returned... Not a problem with the car, just a weak battery. It should be able to sit disconnected for a week without going dead. Anyway, I've found I can easily jump-start it by touching a quarter across the DC/DC contactor, which sends 13v from the 160v main pack to the aux battery and gets everything up and running.
In other news, I've begun tearing the upper motor mounts a little bit. A redesign has already happened in my head, just need to make it happen in the car now... Basically I want to replace the upper mounts which are simple cylindrical rubber vibration isolation mounts with the original beefy rubber engine mount that was in the car. I've ordered the parts I need, but it will require fabricating a new end plate to connect the motor to the new mount. And will require pulling the motor/trans out again. That's ok, there's a few other things I want to do in there too that will be a lot easier with it all out.
Next update will probably be in a few weeks, I'm not going to tear it apart until after the new year, and after I have a chance to get the Big Red Van's transmission looked at (it's slipping a bit). In the meantime, I've lowered the motor amps to 350a to save from doing more damage to the upper mount.
Thursday, December 29, 2011

Thursday, December 8, 2011
a few little updates... It's been running well, the heater has been fine even in the cold 30 degree mornings lately. And that's just with one element switched on. I can't imagine needing the second one! Though it is garage kept right now, which helps keep it not as cooold overnight. Less to have to warm up.
Anyway, I've been tracking my ah/mile (amp hours per mile) through the controller lately, and I've noticed about a 10% difference between the 30 degree morning run to school, and the 55 degree afternoon pickup. All else is pretty equal but the temp. Not too surprising, batteries don't really like cold weather. Even worse case usage, I've still got an easy 45 mile range without flattening the batteries (you really aren't supposed to take them further than 80% discharged) which is plenty for my daily routine. Best case in the summer should be closer to 60 or so miles.
yesterday I wired the brake vacuum pump through a toggle switch so I can shut it off in parking lots for that cool 'silent EV effect' and for those times when the pump sticks on... I plan to do the same to the motor blower, but it's not nearly as noisy so I'm not feeling quite as urgent about it.
it's getting driven between 20-40 miles every day right now, charging up for what I calculate to be the equivalent of ~$1.30/gallon when normalized against the Honda Odyssey it replaced. And working just fine as my main kid transporter! And this is paying a pretty high $.24/kWh with PG&E, should be able to pretty easily cut this in at least half with either solar, or a dedicated E9 rate meter, or both. Down the road a bit for those...
Anyway, I've been tracking my ah/mile (amp hours per mile) through the controller lately, and I've noticed about a 10% difference between the 30 degree morning run to school, and the 55 degree afternoon pickup. All else is pretty equal but the temp. Not too surprising, batteries don't really like cold weather. Even worse case usage, I've still got an easy 45 mile range without flattening the batteries (you really aren't supposed to take them further than 80% discharged) which is plenty for my daily routine. Best case in the summer should be closer to 60 or so miles.
yesterday I wired the brake vacuum pump through a toggle switch so I can shut it off in parking lots for that cool 'silent EV effect' and for those times when the pump sticks on... I plan to do the same to the motor blower, but it's not nearly as noisy so I'm not feeling quite as urgent about it.
it's getting driven between 20-40 miles every day right now, charging up for what I calculate to be the equivalent of ~$1.30/gallon when normalized against the Honda Odyssey it replaced. And working just fine as my main kid transporter! And this is paying a pretty high $.24/kWh with PG&E, should be able to pretty easily cut this in at least half with either solar, or a dedicated E9 rate meter, or both. Down the road a bit for those...
Tuesday, November 29, 2011
New stereo
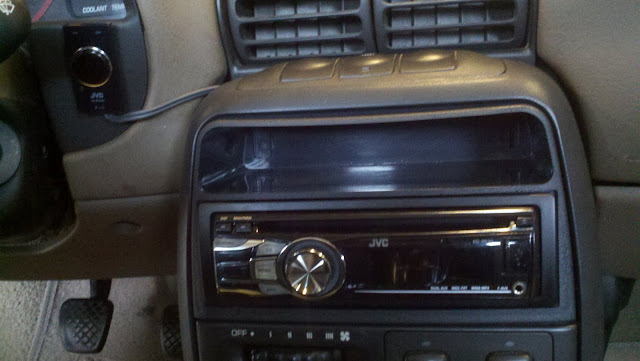
I did a little 'fun' work on the car last night, installed a new stereo and put on a few decals. It had an am/fm cassette, but since installing the new controller, the radio had so much interference I couldn't use it while driving. I tried a Droidx to cassette adapter, but the radio ate the adapter... I pulled the radio out and destroyed it to retrieve my adapter (which works fine in my van, so I wanted to keep it). The new stereo came from Crutchfield, basically just a cheap-ish unit that allows bluetooth. I don't so much care about the phone, I never really have a need to talk on the phone while driving, but I wanted to be able to stream Pandora over bluetooth from the Droidx.
As it turns out, I now have no interference on FM, and only a little bit on AM. I took great care in getting good chassis grounds (instead of grounding through the factory harness), maybe that helped? Anyway, I'm super happy about having radio reception again!
In this pic you can see the bluetooth dongle (it's not integrated directly into the unit) on the left side of the photo. Once again I'm super happy with Crutchfield, and their installation kits. Pretty much plug and play, just had to solder the wires from the supplied car adapter to the radio pigtail. The plastic bezel and little pocket above the radio fit great, and the texture even matches the stock panels.
the following pic shows a more overall shot. I've temporarily removed the pack volt and amp gauges (they used to be where the Droid mount is) because I didn't like them there. I'll either re-install them on the A-pillar (that's where they are on my van, I'm used to it...) or go with a 'virtual' display over the Droid. I'm still investigating my options there, but in the meantime I can either use a laptop on the passenger seat connected to the Synkromotive, or just drive blind (which is what I've been doing for the last few days). There's plenty of safety systems in place to keep the pack safe, I don't really NEED the gauges. But I do like having them.
And here's the new decals. The 'high voltage' and symbols on the left side are basically there to cover up a decal from the original selling dealer. The 'electric' emblem looks pretty good, I think! Still pretty subtle.
As it turns out, I now have no interference on FM, and only a little bit on AM. I took great care in getting good chassis grounds (instead of grounding through the factory harness), maybe that helped? Anyway, I'm super happy about having radio reception again!
In this pic you can see the bluetooth dongle (it's not integrated directly into the unit) on the left side of the photo. Once again I'm super happy with Crutchfield, and their installation kits. Pretty much plug and play, just had to solder the wires from the supplied car adapter to the radio pigtail. The plastic bezel and little pocket above the radio fit great, and the texture even matches the stock panels.
 |
| From 2011-11-29 stereo |
 |
| From 2011-11-29 stereo |
 |
| From 2011-11-29 stereo |
Friday, November 18, 2011
It's been about a week, not much to really update... Car's been running great, I've been driving it every day. Between 20-40 miles/day, charging overnight. I did do a few small things; moved the motor blower to an isolated mount, removed the radio (it ate my ipod tape adapter, so I forcibly removed it!), and installed a shoulder harness for the middle backseat seatbelt so I can now carpool 4 kids to school.
I am having a little problem with the vacuum pump (the pump keeps the vacuum for the power brakes up), it sometimes doesn't shut off. I've found that a sharp 'whack' to the side of the pump does it, so it must just be a sticky pressure switch (the pump has an internal pressure switch). I want to move the pump to the same isolated mount that the motor blower is on, I'll pull it apart and see if I can clean up the switch while I've got it out.
I am having a little problem with the vacuum pump (the pump keeps the vacuum for the power brakes up), it sometimes doesn't shut off. I've found that a sharp 'whack' to the side of the pump does it, so it must just be a sticky pressure switch (the pump has an internal pressure switch). I want to move the pump to the same isolated mount that the motor blower is on, I'll pull it apart and see if I can clean up the switch while I've got it out.
Tuesday, November 8, 2011
range update
just a little range update here... last night I did 27 miles up to a meeting and back, Most of those miles were at 65 mph on the freeway. It was about 40 degrees F out, and I used the heater about 1/2 the time (1500w electric element). It re-charged for ~10 hours at 5.8a last night, about 60ah.
If I assume I don't want to go below 80% dod (depth of discharge, which would be 104ah of my 130ah pack) then I have a freeway range of about 46 miles. A bit more if I don't need the heater. I'll round it up to 50 miles and call it good. It should do even better in warmer weather.
As an aside, for a 15 year old car with over 130k on the chassis, this thing rides smooth! It's nice and quiet on the freeway at 65 in 4th gear, no vibes or anything.
If I assume I don't want to go below 80% dod (depth of discharge, which would be 104ah of my 130ah pack) then I have a freeway range of about 46 miles. A bit more if I don't need the heater. I'll round it up to 50 miles and call it good. It should do even better in warmer weather.
As an aside, for a 15 year old car with over 130k on the chassis, this thing rides smooth! It's nice and quiet on the freeway at 65 in 4th gear, no vibes or anything.
Sunday, November 6, 2011
more pictures
Things are looking good! I installed the Evnetics TPS and the Netgain speed sensor, and rewired the vacuum pump to be on a relay. All went well, I went for a 10 mile or so test drive and had no cutouts or faults. I did lots of experimenting with settings, I’ve settled (at least for now) on 400a battery side and 750a motor side. I’ll just rely on my judgement and right foot control to keep from spinning tires or breaking CV joints… Anyway, with only 400a from the battery I’m not able to get 750a for long at all off the line, but it starts high, then holds over 600a for a while (up to about 2000rpm or so). With these settings it’s pretty quick off the line, and certainly fast enough for daily driving with a little fun when desired. I will still hit a low voltage alarm on the MiniBMS if I try to sustain more than 300ish amps for too long, so I set the low voltage ‘soft’ limit to 135 volts in the Synkromotive software. This lets me use up to 400a briefly, and the controller will taper it back for me when needed. It seems to work well, I did some intentionally hard pulls and never heard the alarm after setting this limit. I never felt any kind of cutback, the controller handles it smoothly. I’ll have to go back to my test road soon and re-test the 0-60.
here's a bunch of photo's from the weekend:
the old potbox
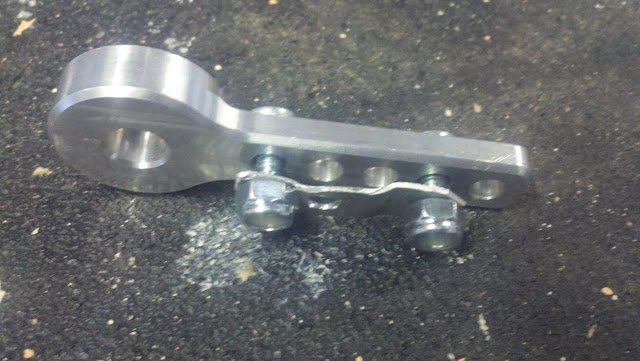
the custom cable holder. just a simple piece of sheetmetal bent and drilled to hold the nub on the end of the cable. the holes in the TPS bracket are already the perfect size for this, so the cable is sandwiched between the arm and this little bracket. each side holds the nub, and it's free to rotate. simple and effective.
here is the arm with the cable attached
here's the whole throttle assembly attached. it is truly a piece of beauty! I'm not sure my car is worthy of such a nice part. it certainly deserves a nicer mounting bracket...
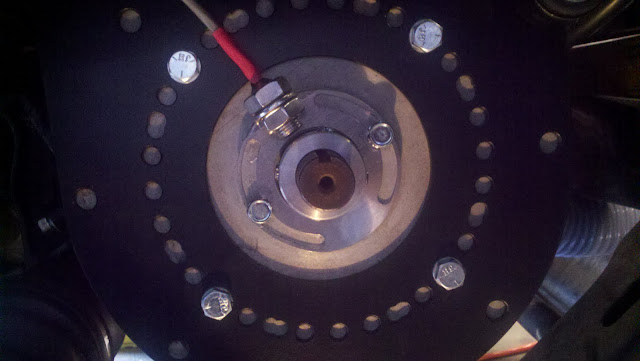
here is the Netgain speed sensor. Very easy to install, the only challenging part was that my motor endshaft had just enough surface rust on it to keep the collar from sliding on. i had to remove the wheel to get better access, then lightly sand the shaft with some 600 grit paper to smooth it up enough to install the collar. although looking at this photo, i can see that I accidentally lined up one of the set screws with the keyway. dang, I'll have to get back in there and rotate it a bit.
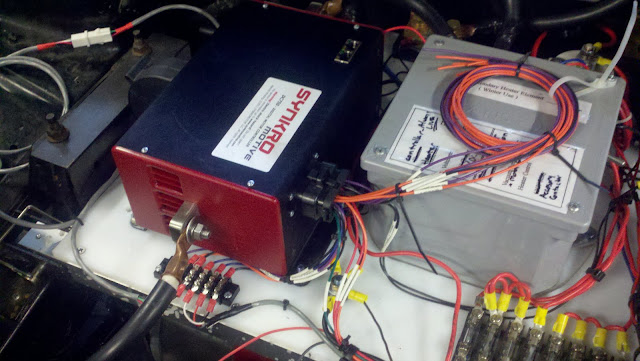
here's the controller! the small terminal block right in front of it holds the connections to the speed sensor and the throttle. The bundle of wires on my heater controls box are the extra wires not needed for my installation (reversing contactor controls, various outputs, etc). Not sure what to do with those yet... all the wires plug into the controller with a nice waterproof connector, which seems a little odd since the controller itself is obviously not waterproof. Anyway, the wires were all nice and long, easy to route and connect up.
here's the backside. Yes, I'm using a second EV200 contactor for my high voltage accessories. Yes, it's overkill.
and the overall shot. this is pretty much finished up. You can see the 12v relay next to the terminal strips, that's for the vacuum pump. The loose wires heading down in the front of the photo are going to the motor blower. I still need to clean up and re-route those wires.
That's it for now. Hopefully it will stay this way for a little while. I do need to put on some of the plastic bits back on up front to get it ready for the rain, but it's basically ready to be my daily driver now.
here's a bunch of photo's from the weekend:
the old potbox
 |
| From 2011-11-06 synkro |
the custom cable holder. just a simple piece of sheetmetal bent and drilled to hold the nub on the end of the cable. the holes in the TPS bracket are already the perfect size for this, so the cable is sandwiched between the arm and this little bracket. each side holds the nub, and it's free to rotate. simple and effective.
 |
| From 2011-11-06 synkro |
here is the arm with the cable attached
 |
| From 2011-11-06 synkro |
here's the whole throttle assembly attached. it is truly a piece of beauty! I'm not sure my car is worthy of such a nice part. it certainly deserves a nicer mounting bracket...
 |
| From 2011-11-06 synkro |
here is the Netgain speed sensor. Very easy to install, the only challenging part was that my motor endshaft had just enough surface rust on it to keep the collar from sliding on. i had to remove the wheel to get better access, then lightly sand the shaft with some 600 grit paper to smooth it up enough to install the collar. although looking at this photo, i can see that I accidentally lined up one of the set screws with the keyway. dang, I'll have to get back in there and rotate it a bit.
 |
| From 2011-11-06 synkro |
here's the controller! the small terminal block right in front of it holds the connections to the speed sensor and the throttle. The bundle of wires on my heater controls box are the extra wires not needed for my installation (reversing contactor controls, various outputs, etc). Not sure what to do with those yet... all the wires plug into the controller with a nice waterproof connector, which seems a little odd since the controller itself is obviously not waterproof. Anyway, the wires were all nice and long, easy to route and connect up.
 |
| From 2011-11-06 synkro |
here's the backside. Yes, I'm using a second EV200 contactor for my high voltage accessories. Yes, it's overkill.
 |
| From 2011-11-06 synkro |
and the overall shot. this is pretty much finished up. You can see the 12v relay next to the terminal strips, that's for the vacuum pump. The loose wires heading down in the front of the photo are going to the motor blower. I still need to clean up and re-route those wires.
 |
| From 2011-11-06 synkro |
That's it for now. Hopefully it will stay this way for a little while. I do need to put on some of the plastic bits back on up front to get it ready for the rain, but it's basically ready to be my daily driver now.
Friday, November 4, 2011
Synkromotive installed
 |
| From 2011-11-04 controller |
I was supposed to spend the weekend in Tahoe, but it's snowing, cold, and I've been sick for a few weeks. I'm really not up for it right now, so I stayed home. On the bright side, I spent some quality time in the garage and got the Synkromotive controller installed tonight! Pretty straightforward, the hardest part was actually getting to the reverse light wire. I had to pull out the 12v battery, and battery tray to get down to it.
All the existing high voltage cables worked as is, I really didn't have to move much around at all One motor cable is now on the opposite side of the controller, but the cable length still works fine. It's just routed differently. The controller comes with all the wires pre-attached to a connector, it took a while to sort them all out and figure out what went where, and which ones I don't need. The ones I'm not using I just zip tied out of the way. Not sure what I'll do with them long term, I don't really want to cut them off permanently. The ones I do need, I just went one at a time, and took my time connecting them where they need to go.
Anyway, I don't have the new throttle position sensor yet, so I just wired in the existing two wire potbox that's in the car. Not ideal, but it will work.
With the main pack disconnected, I powered up the controller and hooked it up to a laptop with the Synkro software installed on it. It just plugs into a USB port, the program recognized the controller when it opened up and everything looked alright. The interface is sweet, just simple and easy to use. I set the battery parameters then calibrated the pot box. So far so good! I flipped on the main pack breaker, and went for the full test. Car in neutral, one hand turning on the key, and the other holding the cord to trip the breaker. Key on, the controller's fan hummed for a few seconds then went off. The stats on the computer showed pack voltage was on. I gave it a little throttle, and there was a nice little hum as the motor slowly turned over.
After verifying everything for a little bit, I took it for a test drive. For the initial test I set the battery amps to 300, and the motor also to 300. first thing I notice is that it is SMOOOOTH!!!! Finally, I can drive it like an electric car. After a few blocks, I pulled over and bumped the motor amps up to 500 (battery still at 300). Nice! Much quicker off the line. Drove around like this a while, then decided to really go for it and bump it up to 750a. Just on the motor side, battery was still at 300. Very nice! Spun the wheels a bit in second gear. Definately faster now. In the interest of not doing anything stupid, I called it a night and came back home.
Up and into the driveway (up a hill while turning and transitioning over a driveway, it's been my nemesis for driving smoothly) without drama, I could stop and start at will. I'm liking it already! And this is with the old potbox, should get even better with the new TPS.
Subscribe to:
Posts (Atom)