so a month or so ago when I first got the car, I went to the DMV to start the registration (out of state car). At that time, they said I couldn't really do much without an official VIN inspection, but they could at least get it in the system under my name, and take my money... I told the worker at that time that it was an electric conversion, so he entered motive power as E. Which would obviously be verified later by the inspector, but I think it really helped my cause to have it entered this way from the get-go.
Anyway, yesterday I went back down there, got a one day pass to drive on the roads, and drove the car down. The inspection consisted of a DMV worker looking at the VIN number, checking a few boxes, and handing me back the paperwork. I then told her that it was electric, and asked her to change the motive power to "E" on her form so it would match what was in the computer (she hadn't even noticed, despite 'inspecting' something under the hood...). So... after a brief discussion where she informed me I was a little bit off to pay $7000 for batteries to build a car that could only go 50 miles (hard to argue on the surface, and I'm certainly not inclined to go into any deep discussion of the merits with her) she changed it to "E".
Lines were too long to go back inside and finish up the paperwork, so I made an appointment for this morning. Went back down this morning, verification in hand, mostly expecting them to tell me I had to go to an official smog referee or something since I shouldn't have to be smogged anymore. Instead, the counter worker typed in some info, charged me more money for registration (only paid transfer tax last time), and handed me a new set of license plates and registration stickers! Holy crap, I'm legal! Way easier than I was expecting.
Although I guess I should hold off judgement until I get my renewal next year and see if it says I have to get a smog check.
Friday, October 21, 2011

Wednesday, October 19, 2011
It's Alive!!
it's alive!
an hour here, an hour there, and over the last few days I've gotten all the wiring back in place. I used a light smear of NO-OX ID "A Special" on the high voltage cable connections. When I was all done and ready to test, I went back and checked and rechecked ALL my wiring a few times. With the high voltage breaker off, I turned on the key and checked all the 12v systems. All good! I have not yet put in the motor fan, and pulled the fuse for the controller fans (just so I could hear any problems a bit easier), the only sound was the contactor engaging, and the vacuum pump pressurizing. 12v where it should be, good to go! Power off, breaker on, ready for the real deal. Here's the final look of the component shelf all wired up, pretty much looks like it did before. I moved stuff around a little, but just detail work. The basics didn't change.
I did my first full voltage test (well, almost full, the batteries are all at 3.30v) with the wheels up. Good thing!! As soon as I turned on the key the motor spun up. simple problem, the throttle cable was not seated correctly in the housing at the potbox. Still, I sort of thought there was some kind of safety that wouldn't let the controller come on if the throttle was on. guess that's only on the new computer controlled fancy controllers (this is a Logisystems 750a). OK, try again... key on, nothing but the vacuum pump. Yeah! I voltmetered a few spots and everything was looking good. 12v where it should be, 158v where it should be! I blipped the potbox by hand, the motor spun up. Nice!
In the car I worked the throttle a bit and ran through the gears. All good. Checked the DC/DC output. good. Checked the heater. yup, it heats. Checked all the lights. yup, everything works. No more stalling, time to drop the car off the jackstands and try it out. I rolled backwards down the driveway into the street on gravity and I put it in second gear. clutch in, some throttle, I could hear the motor spin up. Clutch slowly out, and I'm off! Very cool. I ended up doing around 5 miles around the neighborhood, it ran smooth as long as I started with the clutch. Trying to start out in gear without the clutch was jerky, and without the final torsion mount installed on the motor yet I don't want to risk it so I stuck with using the clutch the whole time.
Successful first test, it's currently non-op'd at the DMV so I've got to go back down there and get it all legal before I drive it anymore. I'm going to start that process tomorrow morning, not sure how hard it will be. I know it will involve a smog referee inspection at a minimum, not sure what all they will need to see.
Here's one more picture of it in the garage plugged in and charging.
an hour here, an hour there, and over the last few days I've gotten all the wiring back in place. I used a light smear of NO-OX ID "A Special" on the high voltage cable connections. When I was all done and ready to test, I went back and checked and rechecked ALL my wiring a few times. With the high voltage breaker off, I turned on the key and checked all the 12v systems. All good! I have not yet put in the motor fan, and pulled the fuse for the controller fans (just so I could hear any problems a bit easier), the only sound was the contactor engaging, and the vacuum pump pressurizing. 12v where it should be, good to go! Power off, breaker on, ready for the real deal. Here's the final look of the component shelf all wired up, pretty much looks like it did before. I moved stuff around a little, but just detail work. The basics didn't change.
 |
| From 2011-10-19 first test |
I did my first full voltage test (well, almost full, the batteries are all at 3.30v) with the wheels up. Good thing!! As soon as I turned on the key the motor spun up. simple problem, the throttle cable was not seated correctly in the housing at the potbox. Still, I sort of thought there was some kind of safety that wouldn't let the controller come on if the throttle was on. guess that's only on the new computer controlled fancy controllers (this is a Logisystems 750a). OK, try again... key on, nothing but the vacuum pump. Yeah! I voltmetered a few spots and everything was looking good. 12v where it should be, 158v where it should be! I blipped the potbox by hand, the motor spun up. Nice!
In the car I worked the throttle a bit and ran through the gears. All good. Checked the DC/DC output. good. Checked the heater. yup, it heats. Checked all the lights. yup, everything works. No more stalling, time to drop the car off the jackstands and try it out. I rolled backwards down the driveway into the street on gravity and I put it in second gear. clutch in, some throttle, I could hear the motor spin up. Clutch slowly out, and I'm off! Very cool. I ended up doing around 5 miles around the neighborhood, it ran smooth as long as I started with the clutch. Trying to start out in gear without the clutch was jerky, and without the final torsion mount installed on the motor yet I don't want to risk it so I stuck with using the clutch the whole time.
Successful first test, it's currently non-op'd at the DMV so I've got to go back down there and get it all legal before I drive it anymore. I'm going to start that process tomorrow morning, not sure how hard it will be. I know it will involve a smog referee inspection at a minimum, not sure what all they will need to see.
Here's one more picture of it in the garage plugged in and charging.
 |
| From 2011-10-19 first test |
Tuesday, October 11, 2011
getting stuff done
got a bunch of little things done today, one of them was replacing the clutch master cylinder/slave assembly (it's sold as a pre-bled kit). The old one had the hydraulic hose replaced with fuel line! No wonder it didn't work... I can't actually test it yet, but it has a good feel now. It is certainly possible that something more major is wrong and the hose was replaced with fuel line just to stop it from leaking, knowing it doesn't work anyway. I won't really know about the clutch till I get it running.
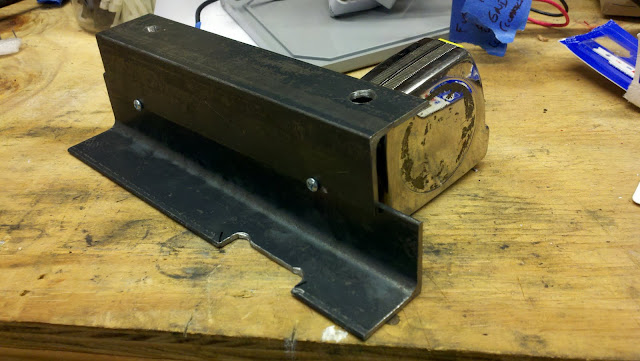
Also finished up the passenger side mount tonight, basically just two pieces of angle that will be welded back to back. this is the piece that connects the old frame bracket (with the rubber mounts on it) to the new motor bracket. Here it is drilled, trimmed (that's my super accurate cutout for the motor blower and bolted together with tiny little screws. I'm gonna take it down to someone to weld it together tomorrow. It will not be seen, so I'm not concerned about how it looks...
I also got moving on the wiring. Mostly things are going back where they were, with some very minor changes. I am making sure that the space for the controller is large enough to fit any of the main contenders I'm considering upgrading to. They are (in no particular order) the Soliton Jr, Synkromotive, Zilla Z1K-LV (which includes mounting the Hairball) and the WarP Drive. No amount of moving stuff around would allow the Soliton1 to fit, but it's out of my budget (and needs) anyway.
Also spent some time figuring out how to route the blower hose, and where to mount the actual blower. It's going to mount nicely under the front battery rack, totally out of the way of anything. I have not mounted it yet, but at least I know where it will go. progress!
Also finished up the passenger side mount tonight, basically just two pieces of angle that will be welded back to back. this is the piece that connects the old frame bracket (with the rubber mounts on it) to the new motor bracket. Here it is drilled, trimmed (that's my super accurate cutout for the motor blower and bolted together with tiny little screws. I'm gonna take it down to someone to weld it together tomorrow. It will not be seen, so I'm not concerned about how it looks...
 |
| From 2011-10-11 |
I also got moving on the wiring. Mostly things are going back where they were, with some very minor changes. I am making sure that the space for the controller is large enough to fit any of the main contenders I'm considering upgrading to. They are (in no particular order) the Soliton Jr, Synkromotive, Zilla Z1K-LV (which includes mounting the Hairball) and the WarP Drive. No amount of moving stuff around would allow the Soliton1 to fit, but it's out of my budget (and needs) anyway.
 |
| From 2011-10-11 |
Also spent some time figuring out how to route the blower hose, and where to mount the actual blower. It's going to mount nicely under the front battery rack, totally out of the way of anything. I have not mounted it yet, but at least I know where it will go. progress!
Saturday, October 8, 2011
motor/trans back in car
Got the motor/trans back in the car, here are a few pics from the last few days...
here's the inside of the trans when I split it apart. Not too bad, a bit greasy. It cleaned up nicely, but I forgot to take a picture of it looking clean.
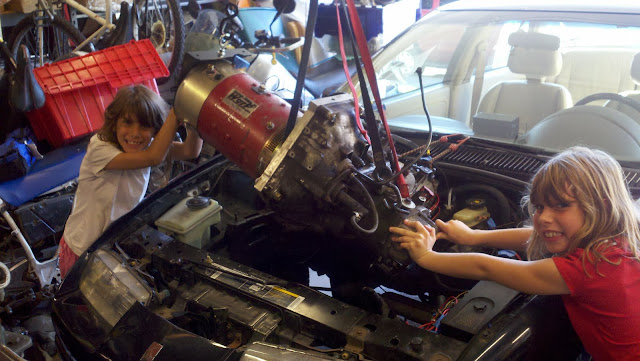
here we are dropping the motor in. You can see the new endplate on the CE side, it is an off the shelf bolt on (many bolt hole options) mounting plate with a foot. I like that better than the clamp that was on there before. I had measured the angle of tilt that ended up working to pull the motor out, and set it to that before starting. Motor/trans dropped right in with the help of some guiding hands.
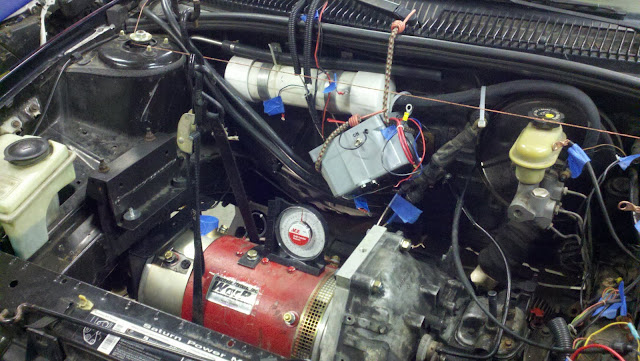
this is more or less the motor's final resting spot. you can see the strap up to the hoist still holding up the motor end, the string tied between the strut towers, and the angle gauge. I still need to make the final connection between the new end plate and the existing rubber mounts which will be simple, two angles welded together. I can cut and fab the parts, but will have to take them to someone to be welded together. Oh, you can see the intake cover on the motor for the blower in this pic too. It does not enter the motor in the most ideal spot from a mounting/routing point of view, but it will work fine.
here's the inside of the trans when I split it apart. Not too bad, a bit greasy. It cleaned up nicely, but I forgot to take a picture of it looking clean.
 |
| From 2011-10-07 motor install |
 |
| From 2011-10-07 motor install |
this is more or less the motor's final resting spot. you can see the strap up to the hoist still holding up the motor end, the string tied between the strut towers, and the angle gauge. I still need to make the final connection between the new end plate and the existing rubber mounts which will be simple, two angles welded together. I can cut and fab the parts, but will have to take them to someone to be welded together. Oh, you can see the intake cover on the motor for the blower in this pic too. It does not enter the motor in the most ideal spot from a mounting/routing point of view, but it will work fine.
 |
| From 2011-10-07 motor install |
Thursday, October 6, 2011
reassembly
Got the motor/trans mated together last night, everything looks good!
After it was reassembled I did a quick 12v spin and it was nice and smooth. I also received a box of parts from EVSource.com. Motor blower kit and rear motor mount. It looks like their prefabbed mount will be pretty close right out of the box, so I decided to buy and modify it rather than have one built locally from scratch. I will still need to have the torsion mount made after it's all installed though.
No pics/video of the reassembly process, but nothing too exciting happened. You've seen one clutch you've seen them all!
I've got some cutting to do, and need to go buy a new blade for my jigsaw before I can start. The garage could use a little organizing, cleaning, and sweeping before rolling the car back in as well.
After it was reassembled I did a quick 12v spin and it was nice and smooth. I also received a box of parts from EVSource.com. Motor blower kit and rear motor mount. It looks like their prefabbed mount will be pretty close right out of the box, so I decided to buy and modify it rather than have one built locally from scratch. I will still need to have the torsion mount made after it's all installed though.
No pics/video of the reassembly process, but nothing too exciting happened. You've seen one clutch you've seen them all!
I've got some cutting to do, and need to go buy a new blade for my jigsaw before I can start. The garage could use a little organizing, cleaning, and sweeping before rolling the car back in as well.
Tuesday, October 4, 2011
splitting motor/trans
So far upon disassembly, everything looks great. I haven't found anything I need to replace yet. Even the clutch disc looks new. Which I guess isn't surprising since the previous owner said the clutch didn't work, so the disc essentially was used as a fixed coupler. There is a slight runout on the flywheel (which has the ring gear removed, btw), maybe .007" at the most (crude measurement with calipers), but I don't feel any vibration in the motor when spun up on 12v with just the flywheel attached. And there's zero wobble, nice and flat. I don't plan on removing the flywheel since that would potentially open up a whole can of worms regarding the coupler, and since the motor and everything looks fine I see no reason to anyway.
I've got a lot of degreasing to do (inside the bellhousing, and the outside of the whole trans) then it will be on to reassembly!
I've got a lot of degreasing to do (inside the bellhousing, and the outside of the whole trans) then it will be on to reassembly!
Sunday, October 2, 2011
Got the motor out!
Finally got the motor out!!! It took me a week to find the time to do one hour of work…
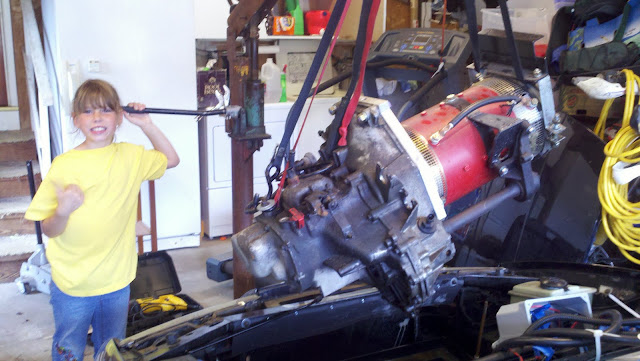
Here’s the obligatory ‘motor hovering over the car’ shot with my helper/hoist operator,
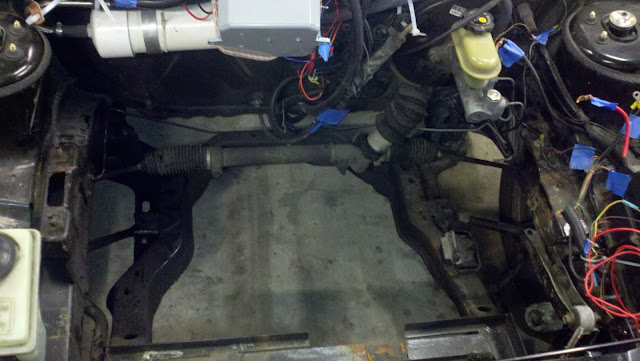
a few more of the motor/trans, and empty car.
Hope to have the motor/trans separated cleaned and inspected in the next few days, then I’ll see what I need to do in order to get it back together.
Here’s the obligatory ‘motor hovering over the car’ shot with my helper/hoist operator,
 |
| From 2011-10-02 pulling motor |
a few more of the motor/trans, and empty car.
 |
| From 2011-10-02 pulling motor |
 |
| From 2011-10-02 pulling motor |
Hope to have the motor/trans separated cleaned and inspected in the next few days, then I’ll see what I need to do in order to get it back together.
Subscribe to:
Posts (Atom)